Create stunning visual masterpieces with the traditional Indian lippan art on pot.
You can transform a simple pot into a work of art by juxtaposing the ancient technique with modern colors and motifs.
Learn how to craft a unique piece of art with just a few supplies and simple steps.
Create an eye-catching piece that will surely draw attention with its intricate designs and vibrant colors.

This guide offers tips and tricks for crafting the ideal lippan art pot.


What is Lippan Art?
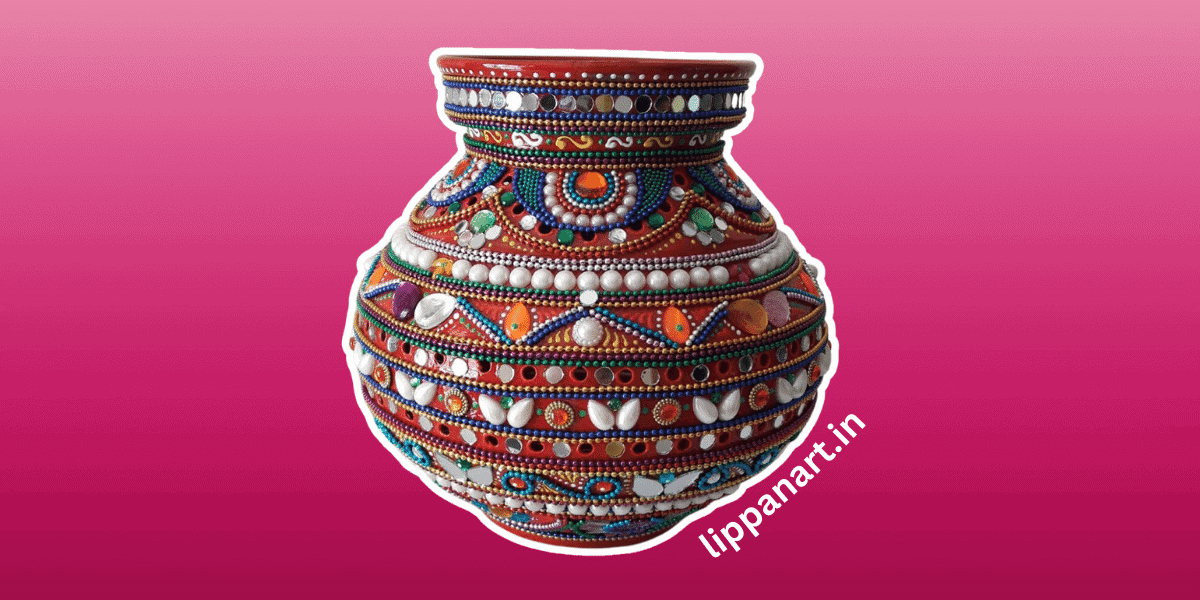
Lippan art is a type of traditional art from India that consists of putting patterns of mud and mirror pieces onto a clay pot. This intricate and beautiful art form has been used for centuries to decorate homes and is a common sight in rural India.
Lippan art comprises a few simple components: clay pots, mirrors, mud, and design sheets. The design sheet is used to help the artist create a desired pattern. The clay pot is then covered in mud, and the mirrors are placed onto the pot according to the design sheet. The final product is an awe-inspiring work of art that the artist carefully crafted.
This art form is visually stunning and serves a functional purpose, as the mirrors reflect light and illuminate the home. If you want to create your own lippan art on a pot, the materials required are easy to find, and the process is relatively simple. You only need a clay pot, mud, mirrors, and a design sheet. Once you have the materials, the process can be broken down into simple steps.
Supplies Needed for Lippan Art
You’ll need some clay, glue, and a few other items to create a lippan design on a pot. To get started, here’s a list of things you’ll need:
- Materials:
- Clay – choose a clay that is designed specifically for lippan art. This type of clay is usually more expensive than other clays, but it is worth the price due to its durability and ability to withstand humidity.
- Mirror pieces – these will be used to create the design on the pot. You can find them in craft stores and online.
- Glue – choose a robust and water-resistant glue to hold the mirror pieces in place.
- Tools:
- Paintbrushes – select a variety of different sizes to ensure that you can complete the intricate design.
- Clay art tools – these tools will help you to create intricate details in the design. You can find a variety of different tools online or in craft stores.
You can create a beautiful lippan design on any pot with these supplies.
Preparing the Pot for Decorating
Before decorating the pot, it’s essential to prepare it to ensure the best results. You’ll need craft clay, flower pots, and a few other supplies to get started.
| Supply | Purpose |
|---|---|
| Craft clay | It will be used to create decorative pieces |
| Flowerpot | To serve as the base for the lippan art |
| Glue | To attach the finished pieces to the pot |
| Pen stands | Helps to keep the design in place while working |
| Aluminum sheet | To provide a texture to the pot |
To prepare the pot, use craft clay to create the desired shapes and forms. Once the designed pieces are dry, attach them to the pot with glue. Using pen stands to keep the pieces in place while working is also important. If desired, an aluminum sheet can be placed on the pot to provide a textured surface.
How to Create the Base Layer
To create the base layer spread craft clay over the pot. Use white clay for this layer, as it will form the foundation for the lippan kaam artwork. Make sure to evenly spread the clay across the pot, creating clay platforms.
Once the clay is applied, let it sit and dry for several hours before beginning the decorative work. The lippan kaam art is created by pressing diamond-shaped mirrors into the clay platforms. Once each platform is filled with mirrors, add details around the mirrors to make the pot come alive.
Use vibrant colors and intricate patterns to make the pot unique and exciting. Finally, let the pot dry for several hours before displaying the beautiful lippan kaam work.


Painting the Motifs
Paint the motifs on the dry clay platforms to complete your lippan kaam masterpiece. You’ll need special craft clay, various colors, and a few basic tools to do this.

Start by selecting the colors you want to use for your design. Choose from a variety of colors, whether you made them yourself or bought them from a store. Then, mix the clay until it becomes a dense paste.
Next, sketch the desired motifs onto the clay platform. Use a ruler to create even lines and measure the size of your design. Once you’re happy with the sketch, you can paint the motifs. Use the different colors to bring your design to life.
Finally, let the lippan art dry completely before shipping. Pack the product with your design images to show off your creativity. Please note that shipping fees may apply depending on the size and destination of your order.
By following these tips, you can create a one-of-a-kind lippan art piece that will stand the test of time as a stylish piece
- Use special craft clay
- Mix the clay together
- Let the art dry before shipping
Adding Textures and Shading
Once you have painted the motifs, add texture and shading to enhance the design. Texture and shading can help bring the design to life. Use various tools like sponges, brushes, and combs when creating texture. Use light strokes to create the desired patterns. When shading, use darker colors to provide contrast and depth. To add more depth, use a combination of dark and light shades.
| Customer Experience | Product Applicable |
|---|---|
| Beautiful designs | Price tags |
| Clay art form | Unique styles |
Adding texture and shading can make the design look beautiful and realistic when done correctly. Experiment with different techniques to find what works best for your design. Make sure to use the right materials for your project, as some materials may need to be revised with certain types of pottery. As you practice, you can create amazing designs with texture and shading. You can create stunning pottery pieces that stand out with some creativity and patience.
- Editor’s Choice

- Best Seller

- Amazon Choice


Adding Finishing Touches
Finish off your design with a few finishing touches for an eye-catching result. To add the finishing touches, display any customer reviews or product details in calligraphy.
To enhance the design, you can also draw individual items, like flowers, leaves, or animals. If you’re shipping the pot to a customer, you can draw their initials or a small symbol to personalize it. This adds a special touch and makes them feel extra special.
Add a few lines, dots, or swirls for a more intricate design. You can even add a few extra colors to brighten up the look.
Sealing the Art
To protect your design, seal it with a clear coat for a lasting finish. Sealing the art is the final step in finishing your project. Taking your time and applying the sealant correctly is important to enjoy your lippan art for years.
Applying the sealant will protect your design and maintain its original beauty, just as when it was first created.
If the sealant is applied improperly, it may result in damage, defects, or inaccuracies in the final product. To ensure the best results, it is important to read the instructions carefully and follow them exactly. When you are finished, allow the sealant to dry completely before you move the pot. Following these steps guarantees that your design will remain intact and endure for many years.
Sealing your lippan art is a simple but important step in preserving your design. Doing it properly will ensure that your pot remains beautiful and that your artwork is protected from dirt or damage. With the right sealant and patience, your lippan art on the pot will be able to be enjoyed for years.
Displaying the Artwork
Now that you’ve sealed your lippan art on a pot, it’s time to show it off! You have plenty of options, depending on what you want to do with it. Here are some ideas:
To use it as a decor item:
- Please place it in your living room or bedroom as a homemade centerpiece.
- Hang it in a study or office to add a creative touch to your decor.
- Incorporate it into other designs to make a unique and repetitive statement.
To sell it:
- Put it up for sale at a flea market or craft fair.
- Contact local stores to see if they would like to sell your item.
- Offer it as a custom product at an online store.
To give it away:
- Use the pot with craft clay as a gift for a friend or family member.
- Give it to a charity or organization.
- Donate it to a local museum or art gallery.
No matter your choice, your lippan art pot will surely be a unique and memorable addition to anyone’s home or office!


Tips for Perfecting Your Lippan Art
Perfecting your lippan art takes practice, but you’ll be proud of the results if you follow a few simple tips!
Firstly, ensure you have the right materials for the job – use a good quality mud paste, fine sawdust, and good quality paint.
Secondly, practice on a sample pot first to get used to the technique.
Thirdly, keep your design simple and use clear lines and colors.
Lastly, take your time when creating the artwork; don’t rush it. If you make a mistake, take a few steps back and reassess.
In addition, make sure you have good customer care when it comes to displaying your artwork. Offer an email address, provide shipping costs, and give customers a price during check-out.
Make sure they know how long it will take for their purchase to arrive.
Frequently Asked Questions
How long will the artwork last?
The lifespan of the artwork will depend on the environment and the materials used. With proper care, it can last for months or even years. However, direct sunlight and moisture exposure can cause it to fade or crack over time.
Is Lippan Art suitable for outdoor use?
Sure, lippan art is suitable for outdoor use – but don’t be fooled into thinking it’s an eternal masterpiece! While the intricate designs look stunning, the artwork will only last for a while. Enjoy it while you can!
What are the best colors to use?
For lippan art, the best colors to use are bright, bold hues like red, orange, yellow, pink, and green. Use contrasting colors to make your artwork stand out.
What is the best type of pot to use?
Clay pots are the best for lippan art as they are durable and easy to work with. Their natural color provides an excellent base for your art – no objections! You can create vibrant and intricate designs that will last years with clay.
What other items can be decorated with Lippan Art?
You can decorate various items with lippan art, such as walls, furniture, mirrors, and accessories like jewelry and handbags. It’s a unique way of showing off your creativity and adding flair to any space.


