You’re about to embark on a creative journey into the world of Lippan art designs. Get ready to explore the captivating process of creating intricate patterns and motifs using a clay/mud mixture.
First, you’ll gather your materials and prepare the surface for your masterpiece.
Then, you’ll dive into the exciting task of adding details and applying the clay mix with your own hands or a spatula.
Once it’s dry, you’ll have the opportunity to paint your design and seal it for protection.

So, let’s dive in and unlock your artistic potential!


Gather Materials
To gather materials for lippan art, choose a suitable surface and ensure it’s clean and smooth. Lippan art is a traditional art form that involves creating intricate designs using clay on surfaces like walls or wooden panels. Before you begin, make sure you have all the necessary lippan art supplies, including clay specifically designed for lippan art. This specialized clay is easy to work with and dries to create a sturdy base for your design.
The design process of lippan art begins with planning your design outline. You can either draw it directly on the surface or sketch it out on paper beforehand. Traditional lippan art often features geometric patterns and floral motifs, but don’t be afraid to experiment with modern and abstract designs.
Once you have your design ready, it’s time to start working with the clay. Take some of the lippan art clay and mix it with water until you achieve paste-like consistency. Some artists also use white cement or adhesive to enhance the strength of their artwork.
Using your hands or a spatula, apply the clay mixture evenly onto the chosen surface. Smooth it out to create a solid base for mirrors or other decorative elements that you might want to add later.
Now that you’ve gathered your materials and started applying the clay let’s move on to preparing the surface by ensuring its cleanliness and smoothness.
Prepare Surface
Ensure the surface’s cleanliness by removing any dust and making it smooth before applying the clay/mud mixture. This step is crucial as it provides a clean canvas for your lippan art design. By eliminating dust and creating a smooth surface, you can ensure that your artwork will adhere properly and look flawless.
Start by wiping down the surface with damp cloth to remove loose dirt or debris. Then, use sandpaper or sanding block to gently smooth out any rough patches or imperfections.
Once surface is clean and smooth, you can begin preparing the clay/mud mixture for application. Mix the clay or mud with water until you achieve a paste-like consistency. Some artists also incorporate white cement or adhesive into their mixture to enhance its strength and longevity. Take your time with this process, ensuring that all ingredients are thoroughly combined.
With the surface prepared and the clay/mud mixture ready, it’s time to create an outline for your lippan art design. This step involves planning and sketching out your desired pattern on paper before transferring it onto the prepared surface. Traditional lippan art often features geometric patterns and floral motifs, but feel free to experiment with modern and abstract designs as well.
Create Outline
Once the surface is clean and smooth, it’s time to start planning your desired pattern for the lippan art. Creating an outline is essential to ensure a well-defined design that will guide you throughout the process. Begin by visualizing the patterns you want to incorporate into your artwork. Traditional lippan art designs often feature intricate geometric patterns and delicate floral motifs but feel free to experiment with modern and abstract designs that reflect your personal style.
To create the outline, use a pencil or chalk to lightly sketch your design directly on the prepared surface. This initial step allows you to make adjustments and corrections before committing to the final layout. Take your time in this phase, as it sets the foundation for the rest of your artwork.

As you create the outline, consider how mirrors will be incorporated into your design. Mirrors are a key element of lippan art, adding dimension and reflecting light within the artwork. Think about where you want to place them and how they will contribute to enhancing specific areas of your design.
With your outline complete, you can now move on to adding details such as mirror placement and decorative elements like beads or stones. These embellishments will further enhance the overall look of your lippan art masterpiece.
Now that you have created an outline for your lippan art design, it’s time to add details such as mirror placement and other decorative elements without interrupting its flow seamlessly into subsequent sections about ‘add details.’
- Editor’s Choice

- Best Seller
- Amazon Choice


Add Details
Now that you’ve sketched your desired pattern, it’s time to start adding the finer details to bring your lippan artwork to life. Take a closer look at your lippan art design outline and think about how you can enhance them with intricate elements. This is where the true beauty of lippan art comes alive.
To add details to design, you can play around with different textures and shapes. Consider using small tools like toothpicks or styluses to create delicate lines or patterns within the larger shapes. You can also experiment with adding small dots or dots of varying sizes to give your artwork a sense of depth and dimension.
Another way to add interest is by incorporating various motifs into your design. Traditional lippan art often features geometric patterns and floral motifs, but don’t be afraid to explore modern and abstract designs as well. Think about what inspires you, and let your creativity guide you.
As you work on adding these finer details, remember to pay attention to balance and symmetry in your design. Step back from time to time and assess how everything is coming together. Make adjustments as needed until you are satisfied with the overall composition.
With the addition of these details, your lippan artwork will truly come alive, reflecting your unique artistic vision. So go ahead, unleash creativity, and watch as each stroke brings more life into your masterpiece.
And now that you’ve added those exquisite details, it’s time for the next step: applying the clay mix onto the surface.
Apply Clay Mix
To apply the clay mix onto the surface, start by spreading it evenly using your hands or a spatula. The lippan art designs should guide you as you carefully apply the clay mixture. This is an important step in creating a strong foundation for your artwork.
As you begin applying the clay mix, make sure to cover the entire surface area, ensuring that there are no gaps or uneven patches. Use your hands to feel for any inconsistencies and smooth them out with gentle strokes. Your fingertips will become familiar with the texture of the clay mix, allowing you to shape it according to your desired design.
The application of the clay mix requires patience and precision. Take your time to ensure that every inch of the surface is covered evenly. The thickness of the layer can vary depending on your design preferences, but be mindful not to make it too thin or too thick.
Once you have applied the clay mix, transition into creating a smooth surface without explicitly stating ‘step.’ Smooth out any rough edges or bumps using your hands or a spatula. This will create a seamless canvas for adding details such as mirrors and other decorative elements.
Smooth Surface
Smooth out rough edges or bumps on the clay mix surface by using your hands or a spatula, ensuring a seamless canvas for adding mirrors and other decorative elements. This step is crucial in creating a flawless foundation for your lippan art designs outline.
As you run your fingers across the surface, feel the texture of the clay mix beneath your touch. Smooth it gently, guiding any imperfections away until you achieve a perfectly smooth surface.
Imagine yourself as an artist, molding and shaping the clay mixture with care and precision. With each stroke of your hand or spatula, you create a blank canvas that will soon come alive with vibrant mirrors and intricate patterns. Take your time in this process, paying attention to every detail to ensure flawless finish.
As you smooth the surface of the clay mix, envision how each mirror will seamlessly blend into the artwork. Think about where you want to place them – close together to form geometric shapes or scattered like stars across a night sky. Consider incorporating other elements, such as beads or stones, to enhance the overall design.
With each stroke of smoothing motion, you bring your creativity to life on this malleable medium. The smoothness of the surface is essential not only for aesthetics but also for ensuring that mirrors adhere firmly once placed.
Now that you have created a smooth surface for your lippan art designs outline, it’s time to let it dry naturally in its own time. Allow nature’s gentle touch to work its magic as air slowly dries out the clay mix. During this process, refrain from rushing or interfering with drying conditions, as it may affect the final outcome.
Incorporating mirrors onto this smooth surface is just one step closer to completing your lippan art masterpiece. So let it dry undisturbed and take pleasure in knowing that soon enough, you’ll be ready to embark on painting and innovating further onto this captivating creation.
Let Dry
Allow the clay mix to dry naturally, giving it time to set and solidify before moving on to the next step in creating your lippan art masterpiece. This crucial stage ensures that your design stays intact and gives a sturdy foundation for the rest of the process. As the clay mixture dries, it will harden, allowing you to work on it without any fear of smudging or ruining your intricate lippan art design outline.
While waiting for the clay mix to let dry, take this opportunity to visualize your paint design. Consider which colors will complement your chosen lippan art design outline and bring them to life. Think about how you add depth and dimension to your artwork through shading and highlighting techniques. Once the clay mix has fully dried, you’ll be ready to apply paint onto its surface.
Transitioning into the next section about ‘paint design,’ now that you’ve patiently allowed the clay mixture to dry, it’s time for some creativity! With a wide range of acrylic paints at your disposal, bring out those vibrant hues and start adding color to your lippan art creation. The dried base provides a stable canvas for you to experiment with different shades and create captivating contrasts within your design.
Remember, each brushstroke is an opportunity for innovation as you combine traditional lippan art techniques with modern elements. Don’t be afraid to think outside the box and incorporate unique mirror shapes or other decorative elements that enhance your overall composition.
Now that you have mastered how to let the clay mix dry naturally let’s dive into exploring fascinating paint designs that will truly make your lippan art masterpiece shine!
- Editor’s Choice

- Best Seller
- Amazon Choice


Paint Design
Now that the clay mix has dried, it’s time to unleash your creativity and add vibrant colors to your lippan masterpiece using acrylic paints. Painting is an essential part of this unique art form, as it allows you to bring life and personality to your design.
Before you begin, take a moment to review the outline of your lippan art design. Your lippan art designs outline serves as a guide for the paint design process. It helps you plan where each color will go and ensures that you achieve a balanced and harmonious composition. Consider incorporating various design elements, such as decorative patterns and geometrical patterns, into your artwork. These elements can add depth and visual interest to your piece.
When it comes to coloring techniques in lippan art, there are no limits. You can choose bold and vibrant colors or opt for a more subdued palette – the choice is yours! Experiment with different shades and explore various decorative techniques like shading, blending, or adding texture through brushstrokes.
As you apply acrylic paints to your lippan artwork, remember that this is an opportunity for innovation. Feel free to deviate from traditional methods and incorporate new ideas into your design. You can even try using different materials alongside the paint, such as metallic foils or glitter accents, to enhance the overall look of your masterpiece.
With each stroke of paint on the dried clay surface, watch as your lippan art comes alive with color and vibrancy. As you finish painting your design, let’s move on to sealing and protecting it without further delay.
Sealant application is essential for preserving the beauty of your painted lippan artwork while providing extra protection against wear and tear over time.
Seal and Protect
To ensure the longevity of your vibrant lippan masterpiece, it’s time to apply a thin layer of transparent varnish or sealant over the painted surface. This final step in the process will not only protect your artwork from dust and damage but also enhance its overall appearance. After spending time carefully designing and painting your lippan art, you want to make sure it stays beautiful for years to come.
Once you have completed painting the intricate designs on your lippan art, allow the paint to dry completely. Take a moment to admire the stunning combination of colors and patterns that bring your creation to life. Now, it’s time to seal and protect it.
Gently brush on a thin layer of transparent varnish or sealant over the entire painted surface. Make sure to cover every nook and cranny of your lippan art design outline. The varnish will create a protective barrier that shields the paint from fading or peeling over time.
As you apply the varnish, watch how it brings out the vibrancy of the colors even more. It adds depth and texture to your artwork, making it truly pop off the wall or panel where it is displayed. This extra touch ensures that your lippan art remains as striking as when you first finished creating it.
Now that you have sealed and protected your lippan masterpiece, all that’s left is for you to display and enjoy its beauty in any space you choose. Whether hung on a wall or placed on a stand, let your artwork become a focal point in any room. Its unique charm will captivate all who see it, leaving them in awe of this ancient yet contemporary art form.
So go ahead, find the perfect spot for your lippan art creation, and let its beauty shine!
Display and Enjoy
Find a prominent spot in your home where you can proudly display and enjoy your vibrant lippan masterpiece. After all the hard work you put into creating your lippan art design, it’s time to showcase it for everyone to admire. Choose a wall or any suitable surface that will allow your artwork to take center stage.
Before displaying your lippan art, make sure the surface is clean, smooth, and free from dust. This will ensure that artwork looks its best. Once you have prepared the surface, carefully mount your lippan art piece using nails or hooks.
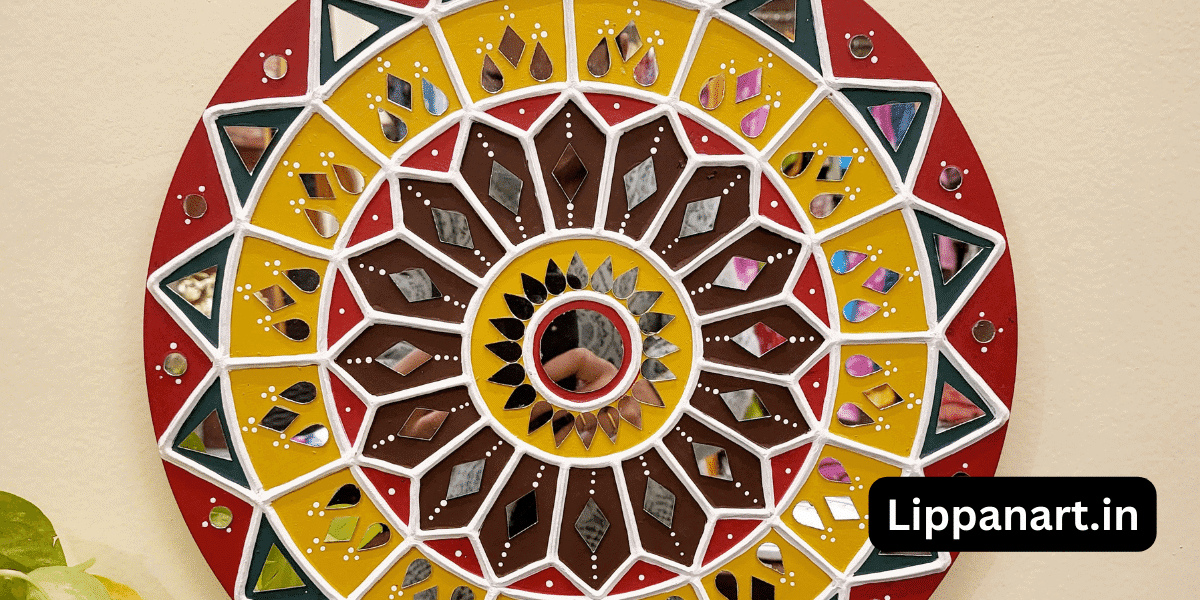
As you step back and admire your creation, take a moment to appreciate the intricate designs and patterns that make up your lippan art. The outline of the geometric shapes and floral motifs adds depth and dimension to the overall composition. Allow yourself to be captivated by the play of light as it reflects off the small mirrors embedded within the clay/mud mixture.
To enhance the visual appeal of your lippan art, consider adding other decorative elements, such as beads or stones. These embellishments can further elevate the beauty of your artwork and make it truly unique.
Every time you pass by or sit in front of your displayed lippan masterpiece, let yourself bask in its beauty. Enjoy how it brings life and vibrancy to any space in which it is showcased. Your lippan art is not just an expression of creativity; it is also a reflection of who you are as an artist.
So find that perfect spot in your home where you can proudly display and enjoy your vibrant lippan masterpiece. Let it be a source of inspiration for others as they marvel at its intricate details and unique design outline.


Frequently Asked Questions
What Are Some Common Mistakes to Avoid When Applying the Clay/Mud Mixture for Lippan Art?
When applying the clay/mud mixture for lippan art, there are a few common mistakes to avoid.
First, make sure the surface is clean and smooth before applying the mixture.
Also, be careful not to mix too much water with the clay/mud, as it may become too runny.
Another mistake to avoid is spreading the mixture unevenly on the surface, as this can affect the overall appearance of your artwork.
Can Lippan Art Be Done on Surfaces Other Than Walls or Wooden Panels?
Yes, lippan art can be done on surfaces other than walls or wooden panels. You have the freedom to explore and experiment with various surfaces like ceramic tiles, glass, metal sheets, or even canvas.
The key is to ensure that the surface is clean and smooth before applying the clay/mud mixture. This allows for a strong bond between the surface and the artwork.
So go ahead and unleash your creativity on different surfaces for unique lippan art designs!
Are There Any Special Techniques for Incorporating Beads or Stones Into Lippan Art Designs?
To incorporate beads or stones into your lippan art designs, there are a few special techniques you can try.
First, consider adding them after pressing the mirrors into the wet clay/mud mixture. You can place them strategically around the mirrors to enhance the overall look of your artwork.
Another option is to embed the beads or stones directly into the clay/mud mixture before it dries completely. This will create a more integrated and textured design.
Get creative and experiment with different combinations to make your lippan art truly unique!
How Long Does It Typically Take for the Clay/Mud Mixture to Dry Completely?
It takes about 24 to 48 hours for the clay/mud mixture to dry completely, depending on the weather conditions. During this time, it’s important to ensure that the mirrors are firmly fixed in place.
Once the mixture is fully dried, you can apply a thin layer of transparent varnish or sealant over the mirrors to protect them and give them a shiny appearance. This will enhance the overall look of your lippan art design.
Can Lippan Art Designs Be Easily Removed or Modified Once They Are Completed?
Once completed, lippan art designs are not easily removed or modified. The clay/mud mixture used to create the design dries completely, becoming firm and sturdy. Mirrors are firmly fixed in place and sealed with a layer of transparent varnish or sealant.
However, if you wish to make changes, it is possible to paint over the existing design or add new elements on top. This allows for innovation and the opportunity to combine lippan art with other art forms for a unique twist.
Final Thoughts
Congratulations on completing your lippan art masterpiece! As you step back and admire the intricate designs, your heart swells with pride and satisfaction. The smooth clay mixture, skillfully molded by your hands, forms a solid foundation for the dazzling mirrors that reflect light like shimmering stars in the night sky.
Each brushstroke of vibrant acrylic paint breathes life into the monochromatic canvas, transforming it into a captivating work of art. With a final touch of transparent varnish, your creation gleams and glistens as if whispering secrets to those who gaze upon it.
Now it’s time to find the perfect spot to display this remarkable fusion of tradition and innovation – a testament to your creativity and dedication.
Let your lippan art shine brightly for all to see and marvel at its beauty!


