
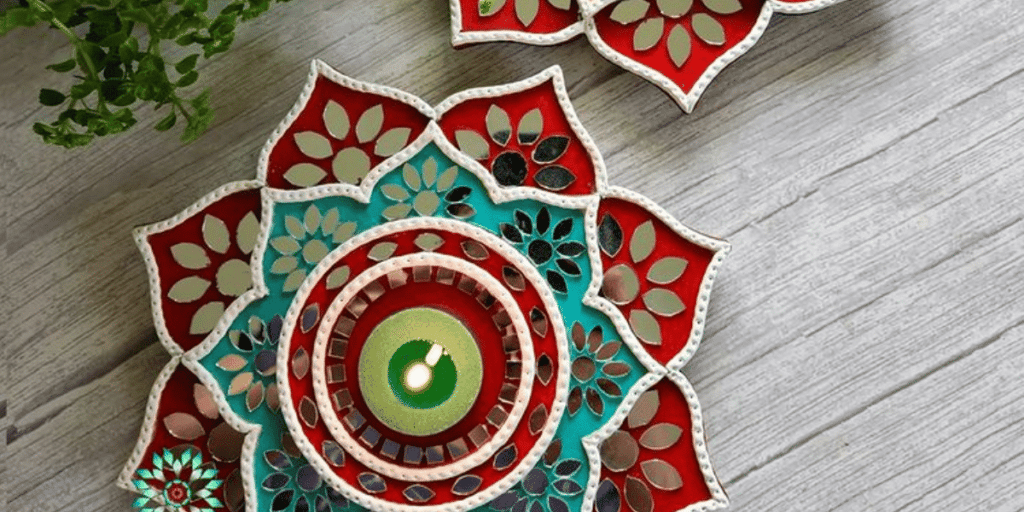
Bring your artwork to life with illuminated lippan art!
Imagine the awe of your guests as they gaze upon an intricate lippan art design, glowing with a captivating radiance.
With just a few supplies and some time, transform your artwork into mesmerizing home decor.
Read on to learn how to make your lippan art light up and come alive.


Key Takeaways
- Ensure that your lippan art piece is fully dry and ready for illumination.
- Plan the lighting placement on your lippan art piece.
- Use clear adhesive or glue to attach the LED string lights to the backside of your lippan art.
- Conceal the wiring if needed by running it along the edges or behind furniture.
Prepare Your Finished Lippan Art
Make sure your lippan art is completely dry before attaching the LED lights.
Different types of lippan art techniques can be used to create stunning, illuminated artwork.
Consider the size, shape, colour, temperature, and brightness of
LED lights for your lippan art.
If you want to control the brightness of the lights, you can install a dimmer switch.
To add an extra dimension to your lippan art, incorporate coloured lights.
For a custom look, you can create a DIY lippan art frame to mount your illuminated piece.
Illuminated lippan art can be a captivating and unique home décor element.

- Editor’s Choice

- Best Seller
- Amazon Choice


Plan the Lighting Placement
Decide where you want to place the LED string lights on your lippan art piece to add a captivating dimension. Get creative with your lighting design and explore different colour options to highlight specific designs or outline the entire artwork.
For DIYers, adhesive or glue can be used to attach the lights to the backside of your lippan art. Look for small adhesive clips or hooks to hold the lights in place if your lippan art is on a vertical surface.
Consider troubleshooting tips like concealing wiring along the edges or behind furniture and using an extension cord to connect the lights to a power source.
With the right lighting placement, your lippan art will come alive and be the envy of your friends.
Attach the LED String Lights

Using adhesive or glue, attach the LED string lights to the backside of your lippan art and secure them firmly along the chosen path. Get creative with your lighting design by exploring different placement tips and exploring different lighting effects. You can use DIY LED string lights to light up your artwork in unique and creative ways.
Here are some tips for troubleshooting common issues:
Placement Tips:
- Consider the size of your lippan art and the size of the LED lights.
- Choose a placement that highlights design elements or outlines the artwork.
- Avoid placing the lights too close together.
Different Lighting Effects:
- Try different types of lighting for a variety of effects.
- Explore different colours and brightness settings.
- Consider the direction of the lighting.
Troubleshooting Common Issues:
- Check the wiring and connections to make sure they’re secure.
- Make sure the power source is connected properly.
- Replace batteries as needed.
With a bit of ingenuity and creative lighting ideas, you can make your lippan art come to life with a captivating illuminated display.
- Editor’s Choice

- Best Seller

- Amazon Choice

Conceal wiring (if needed)
If your lippan art is on a wall, consider concealing the wiring to keep it out of sight. Creative lighting solutions like wire concealment and cord management can help you neatly hide cables and achieve the perfect lighting placement.
Utilize innovative techniques to really make your lippan art stand out – it could be as simple as using furniture or other objects to hide the wiring. To get the most out of your lighting, think outside the box and come up with creative solutions to hide the cables and cords.
With some creative lighting solutions, you can keep your lippan art looking neat and professional while also taking advantage of your lighting placement tips.
Test the Lighting
Before mounting the artwork, test the LED lights to make sure they work properly and give the desired effect so you can enjoy your illuminated lippan art. Consider the following when testing the lighting options:
Troubleshooting Tips:
- Check the light connections for any loose wires.
- Ensure proper function of the power source
- and LED lights on all settings.
Creative Lighting Techniques:
- Use different colours to create a unique lighting effect.
- Experiment with different lighting placements.
- Try combining different light shapes and sizes.
DIY Lighting Accessories:
- Look for creative ways to customize your lighting colours.
- Try to make your lighting accessories from everyday materials.
- Look for unique ways to display your illuminated lippan art.
Secure the Battery or Power Source
Secure the battery or power source to the back of your lippan art piece using adhesive or hooks so you can turn on the lights and enjoy your illuminated artwork. This is a crucial step to make sure you get the best possible lighting effects and illumination options.
Use small adhesive clips or hooks to secure the power source if your lippan art is vertical. If using plug-in lights, make sure the power cord is properly managed and connected to a power source. You can also use an extension cord if necessary.
With the power source secured, you can now turn on the lights and see your artwork come to life with captivating illumination. Enjoy your gorgeous illuminated lippan art!
- Editor’s Choice

- Best Seller
- Amazon Choice


Mount or Hang Your Artwork
Once the lights are securely attached, and the power source is in place, you’re ready to hang or mount your illuminated lippan art piece.
When choosing the perfect location, consider the amount of light that will be cast and the potential shadows it may create.
To create a unique display, use different lighting colours and add a dimmer switch to adjust brightness as desired.
Incorporating a timer can also be a great way to save energy.
With these innovative ideas, you can bring your artwork to life and take your lippan art to the next level!
Turn on the Lights
When you’re ready, switch on the LED lights to bring your lippan art to life!
With a few lighting techniques, you can create a captivating display that will draw attention to your intricate designs.
Explore the colour options available to find the perfect hue, and take safety precautions to ensure your artwork is secure.
If you’re feeling adventurous, you can even try DIY alternatives to light up your art.
But don’t forget about maintenance! Regularly check the lights and wiring to ensure they remain in good condition and replace batteries as needed.
Just relax and appreciate the stunning beauty of your illuminated Lippan art!


Enjoy Your Illuminated Lippan Art
Step back and admire your artwork as it comes to life with the added illumination! Illuminating your lippan art with LED string lights will create unique lighting effects and draw attention to intricate details. You can play with colours and patterns to create a captivating focal point and enhance the ambience of your home.
Unique Lighting Effects:
- Showcase intricate details with light and shadow
- Create a captivating display to draw attention
- Highlight specific elements of the artwork
Creating a Focal Point:
- Outline the artwork with LED string lights
- Position the lights to create the desired effect
- Add a mesmerizing touch with twinkling lights
Enhancing the Ambiance:
- Use different colours and brightness settings
- Play with the interplay of light and shadow
- Set the mood with a soft glow or vibrant display
Conclusion
You now know how to make lippan art light up and add a mesmerizing touch to your artwork! With the right supplies and a bit of time, you can create a captivating and unique piece of art that will be sure to draw the eye.
On average, lippan art takes around four hours to complete, but the results are sure to be worth it.
So what’re you waiting for? Get started on creating your illuminated lippan art today!


