Create something beautiful and unique with DIY modern Lippan art. Combining traditional techniques with contemporary materials, this art form is easy to learn and offers endless possibilities.
With the right tools and supplies, you can craft a stunning piece of decor to show off in your home.
So, let’s explore the materials and techniques you’ll need for this special project.


What is Lippan Art?

Lippan art is a traditional clay art from Gujarat, India, adapted with modern materials and techniques. Village women primarily use it in Kutch to decorate their homes and involves MDF boards, Shilpkar clay, glass pieces, acrylic paint, and various tools like paintbrushes, ice cream sticks, and toothpicks.
The technique involves drawing a design on the MDF board and using it as a guide for clay application. The clay is mixed and manipulated, and mirrors can be embedded for an extra contemporary look. Finally, the lippan kaam is painted with a white base coat and additional colours.
It’s a unique art form that can be used to create stunning and modern works of art.
Gather the Materials
To create a modern lippan art piece, you’ll need to gather the necessary materials. An MDF board measuring 6mm and 18×18 inches serves as the base.
Then, you’ll need shilpkar clay, a white and nonstick version of M-seal. You can find glass pieces at most art and craft stores. Acrylic paint is also necessary, as it’s used for painting the creation.
To complete the lippan art, you’ll also need various tools such as paintbrushes, ice cream sticks, and toothpicks.
To begin, draw the design on the MDF board and use it as a guide for the clay application. Then, mix and manipulate the clay and embed mud mirror pieces to give the lippan art a unique look.
Once the clay is in place, paint the lippan kaam with a base coat of white acrylic paint, and add additional colours for a contemporary look.
You can create your modern lippan art piece with these materials and tools!
Select the Design
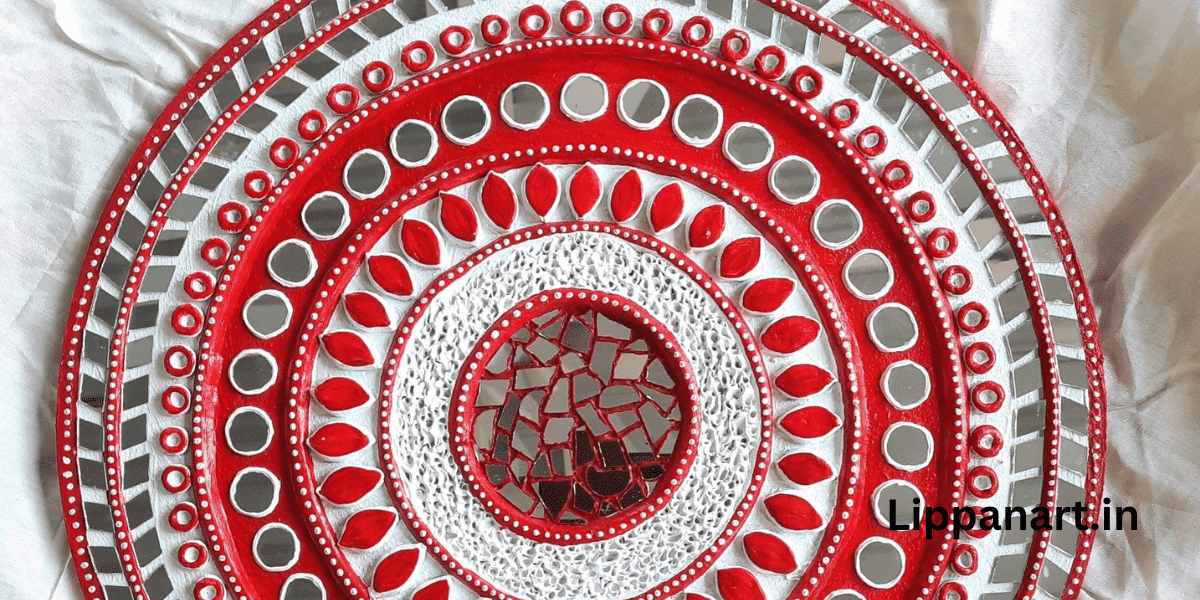
Choose a design for your lippan art piece that speaks to you and reflects your interests or personality. When selecting a design, consider the range of shapes and sizes you can achieve with the materials you have. You can use a paintbrush, white acrylic paint, and an inch mirror to create a symmetrical or asymmetrical design. You can also arrange different shapes of mirrors to make a unique piece. For a more intricate design, you can use small pieces of mirrors to add texture and dimension. Using some basic materials and tools makes it possible to make a striking lippan art piece.
| Shapes | Colours | Texture |
|---|---|---|
| Symmetrical | White Acrylic Paint | Small Pieces of Mirrors |
| Asymmetrical | ||
Prepare the Clay
To make your lippan artwork, follow the instructions on the Shilpkar clay package to mix the clay with water until it becomes a moldable texture.
You can use this clay to make traditional designs on walls or to create more contemporary works of art.
Once your clay is ready, you can design your lippan art piece. You can create relief with the clay or use it to make a flat design, depending on the effect you want to achieve.

You can use polymer clay to create more intricate designs or to add more texture to the piece.
Once your design is ready, use a base coat of white acrylic paint to secure the clay.
Once the paint is dry, add colours to your lippan kaam for a contemporary look.
You can create a beautiful lippan art piece with the right materials and techniques.
- Editor’s Choice

- Best Seller
- Amazon Choice


Make an Embossed Outline
Using various tools, such as paint brushes, ice cream sticks, and toothpicks, you can emboss an outline on your lippan kaam clay art. Embossing is a craft technique to create intricate designs and shapes on clay.
To begin, mix the clay mixture with a few drops of water to make it easier to work. Once you have a thick paste-like consistency, you can sculpt the clay with your tools. Use the paintbrush to outline your design, then use the ice cream sticks, toothpicks, and other sculpting tools to emboss the clay.
Once the outline is complete, you can use water-based paints to colour your design. You can create beautiful lippan art pieces with embossed designs with patience and practice.
Fill in the Design
Once embossed the outline, you can fill in the design with the shilpkar clay. To begin, mix the shilpkar clay with terracotta clay to create a mixture of the same colour as the Indian Lippan Art. Then take the mixture and fill in the design on the MDF board. Be sure to fill it in completely, paying attention to the details of the embossed outline.
Once the design is filled in, use a tool like an ice cream stick or a toothpick to press the clay into the embossed outline and to give it a finished look.
You can also use natural clay instead of shilpkar clay for a more traditional look. Natural clay is more brittle and takes longer to dry, so give it enough time to set before painting it.
You can also combine natural and shilpkar clay to get the traditional look with a modern twist. Try out various colours and textures to craft one-of-a-kind and breathtaking designs.
Apply the Mirror Pieces
You may also incorporate mirror pieces into the design to make your Lippan Kaam Clay Art more distinctive. Art and craft sellers can obtain mirror pieces in various shapes and sizes.
Here are four simple steps to applying them to your modern lippan art:
- Soak the mirror pieces in water for 10-15 minutes.
- Take the clay and mix it with water to make a paste-like texture.
- Paste a small amount of the clay onto the back of the mirror pieces.
- Place the mirror pieces onto the design and press gently to secure them.
The mirror pieces will add an extra dimension to your lippan art form, creating a beautiful, glimmering effect. Moreover, the modern lippan art will look great when light hits the mirror pieces, making it an eye-catching wall decoration.
- Editor’s Choice
- Best Seller
- Amazon Choice


Embellish with Beads and Sequins
Adding beads and sequins to your lippan creation can give it a unique and eye-catching look. To apply, use a coat of clay on the surface and press the beads or sequins into the layer. Make sure to use a light touch and not to press too hard to avoid cracking the clay. Once the beads and sequins are in place, you can apply additional clay coats to secure them to the surface. This will also help blend traditional lippan art with modern materials.
| Material | Quantity |
|---|---|
| Beads | Enough to cover the clay surface |
| Sequins | Enough to cover the clay surface |
| Clay | Enough to cover the clay surface |
| Clay Coats | 2-3 |
Bake the Artwork
After adding the beads and sequins, it’s time to bake the artwork. Baking the artwork is crucial in creating a beautiful and durable lippan kaam.
To do this, you will need a few materials and tools:
- A baking tray
- An oven
- An oven thermometer
- An oven mitt
To get started, preheat the oven to 200°C. Then, put the baking tray on the middle rack and place the lippan kaam on it. It’s important to check the temperature using an oven thermometer and adjust if necessary.
After the oven reaches the specified temperature, carefully put the lippan kaam inside and bake for 30 minutes. Make sure to use an oven mitt to avoid burning your hands.
When baking, let the artwork cool before leaving the oven. This simple process will ensure that your walls with clay artwork are durable and will last for years. The baking also helps to set the colours and the simple lines of the lippan kaam.
You can create beautiful and unique art and craft pieces with the right materials and techniques.
Display Your Masterpiece
Once your masterpiece is complete, display it proudly in your home!
There are many ways to show off your beautiful designs and contemporary lippan artwork. Displaying your art on a wall or shelf effectively shows off your new creation.
Alternatively, you can frame it and hang it like a painting. To keep your artwork safe, you can also use an instruction manual to store it in a box or other container.
You can even pass it around as a real lippan art treat. Adding geometric patterns to a room can be an excellent way to introduce colour and texture.
Sharing your masterpiece with the world is easy with just a few simple steps.


Frequently Asked Questions
What is the best way to store and preserve lippan art?
To preserve lippan art, keep it away from direct sunlight and humidity. Make sure you mount it on a sturdy wall and keep it in a clean and dry environment. Avoid touching it with your hands, and don’t hang anything heavy on it. Cover it with acid-free tissue paper when not displaying it.
What kind of glue should be used to attach mirrors and beads?
For a sturdy grip, it is recommended to utilize a robust adhesive such as a hot glue gun or an epoxy adhesive. With these, your mirrors and beads will stay intact, helping you create a stunning piece of lippan art that will be admired for years.
How long does it take to make a lippan art piece?
Making a lippan art piece can take anywhere from a few hours to a few days, depending on the size and complexity of the design.
Are there any special techniques for painting lippan art?
Painting lippan art is like a delicate dance requiring patience and skill. Use acrylic paints, and mix and blend colours for a unique look. Choose from tools like brushes, sticks, and toothpicks to create texture and depth. Add a base coat of white, and allow to dry before adding the finishing touches.
What type of environment is best suited for lippan art?
For best results, lippan art should be applied in a dry environment with minimal humidity. Avoid dampness, as this can cause cracks and discolouration.


