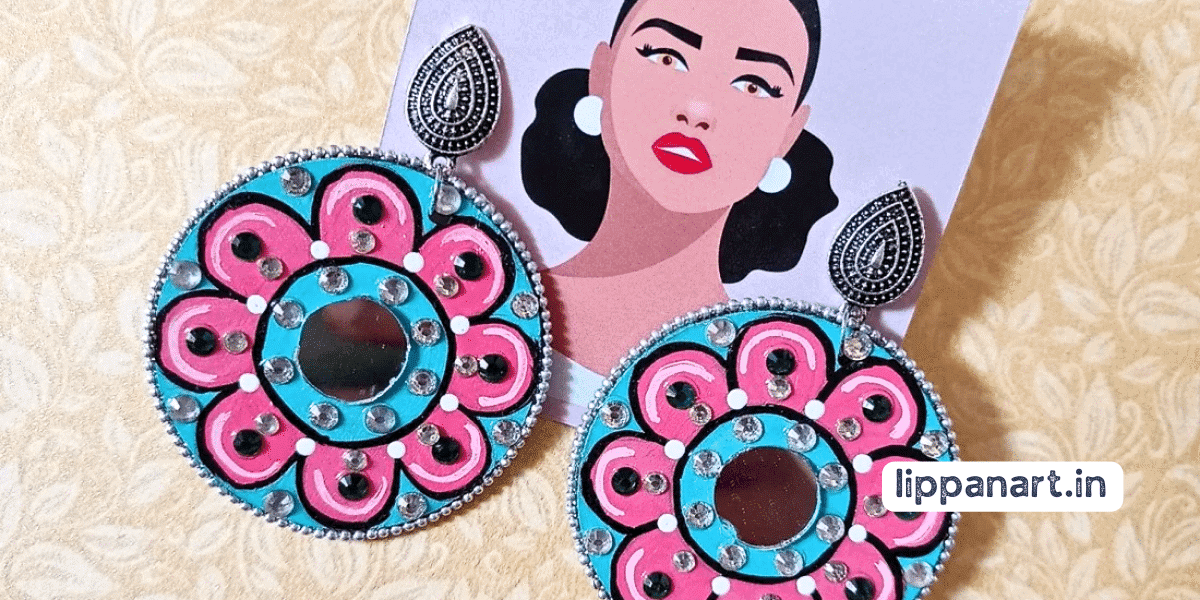
Create a stunning statement with unique handmade lippan art earrings!
You’ll feel like a master artist as you craft these intricate designs.
Gather your materials and roll out the clay to begin your journey. Cut out your favourite shape and attach the findings before painting and sealing for a lasting finish. Enjoy the satisfaction of wearing a one-of-a-kind masterpiece!


Key Takeaways
- Gathering materials and preparing the clay are essential to making Lippan Art Earrings.
- Creating a unique design and using various painting techniques and colour combinations can enhance the beauty of the earrings.
- The earrings can be customized and painted uniquely to suit individual preferences.
- Adding texture and sealing the earrings are important for a finished and polished look.
Gather Materials

You’ll need to gather the materials for making lippan art earrings, such as clay, a rolling pin, and paint.
To begin, choose the colour of the clay you want to use. This is an important part of the design process as it will be the base colour for your earring design.
Next, select the shapes you want to use for your earrings. You can explore patterns or select one shape for both earrings.
After that, you can add texture to the pieces using the rolling pin.
Finally, consider embedding accents into the clay pieces. Accents can be beads, shells, or any other inspiring materials.
You can begin your lippan art earring creation with all the materials gathered.

Prepare Clay
You must prepare the clay for your lippan art earring design by kneading it until it reaches the desired texture and shape. This will allow you to explore mirroring techniques, colour combinations, texturing options, and shaping methods for unique design results.
Here are some tips to keep in mind when preparing the clay:
- To achieve the desired thickness, utilize a rolling pin to flatten and shape the clay.
- Experiment with colour combinations to achieve the desired look
- Use different texturing options to add texture and dimension to the design
Once you have achieved the desired texture and shape, you can add finishing touches to your earrings. Use your imagination and creativity to bring your design to life. Have fun and enjoy the process of creating something unique and beautiful.
Create Design
What design will you create for your lippan art earrings? Get creative and explore your options, as there are countless possibilities.
Start by creating shapes and experimenting with colours. You can use unique combinations to bring your vision to life.
You can also explore different patterns and textures and mix media to create something special. If you have a particular design in mind, draw it out and use it as a reference. Try to be open to different ideas, and don’t be afraid to make mistakes, as they can lead to interesting results.
You can also look at other examples of lippan art earrings for inspiration.
Roll Out Clay

You’ll need to roll out a piece of clay to make your lippan art earrings. Clay comes in various types, so select one suited to your desired result. You can use a rolling pin or clay rolling machine to get an even surface. When shaping the clay, use scoring, cutting, and pinching techniques to create intricate patterns. Apply colour combinations to the clay and let it dry for a few hours. Once done, carefully remove the clay from the earring mould and finish with some final touches.
To create stunning lippan art earrings, it is essential to use the right tools and techniques:
- Try different shaping techniques to create intricate patterns.
- Choose the right clay type for your desired result.
- Use colour combinations to give your earrings an extra pop of colour.


Cut Design
You can use a sharp knife to cut out intricate designs on the clay before it dries to make your lippan art earrings.
Embellishing techniques such as cutting, engraving, and embossing are all popular ways to create unique designs.
To create a more diverse and interesting range of earring colours, use materials like glitter, paint, and metal to introduce texture and dimension.
Creative inspiration for your lippan art earrings can come from anywhere, such as nature, culture, or even your imagination.
When selecting the materials for your earrings, choose lightweight and durable clay.
Once you’ve cut out your design, it’s time to add the finishing touches. You can use a brush to paint the clay or add a layer of lacquer to give it a glossy finish.
With creativity and the right materials, make a statement with stunning Lippan art earrings.
Bake Clay
Once you’ve cut out your design, you must bake the clay to set the design and harden the earrings. Before baking, select the pigment you want to use to colour the clay if desired.
You can use various shaping techniques, such as rolling, cutting, carving, and stamping, to give the clay the desired texture and shape. Once the clay is shaped, you’ll need to dry it. There are many drying methods, such as air drying, oven baking, and microwaving.
Once the clay is dry, you can use various texturing options, such as painting, stippling, stencilling, and stamping, to give it texture and depth. After texturing, the clay is ready to be fired. The clay is heated to a certain temperature during firing to make the earrings hard and durable. The firing temperature used will depend on the type of clay.
When firing, you’ll need to follow these steps:
- Place the clay earrings on a kiln shelf
- Set the temperature depending on the type of clay used
- Monitor the temperature and adjust as needed
- Allow the earrings to cool before taking them out of the kiln.
Attach Findings
Once you’ve fired the clay, you can attach findings to make your earrings wearable. Start by selecting findings that match the size and shape of your clay earrings. You can also choose a finding to set off the colours you’ve used in your piece. Consider a gold-toned finding for a piece with many warm colours or silver for a piece with many cool colours.
Mixing and matching the materials of the findings can also create interesting effects. Try combining a metal finding with a plastic or a plastic finding with a clay bead. If you’ve created a patterned texture in your clay earrings, find a finding that complements the pattern. This could be a finding that has a similar textured pattern or a finding with a similar shape.
Finally, consider the way you’ll attach the findings. If you’re using a metal finding, you can use a soldering iron to attach it to the clay. If you’re using a plastic finding, you can drill a hole in the clay and thread the finding through the hole. If you’re upcycling old earrings, you can use pliers to detach the findings and attach them to your clay earrings.
Using your imagination, you can develop innovative ways to make your earrings stand out and be unique!


Attach Earrings
Finally, easily attach your earrings to complete your unique Lippan Art Earrings.
Findings are critical in designing your earrings, so take time to choose the right ones. Here are a few tips to follow to ensure the safety and style of your earrings:
- Choose a style: There are various designs and variations, such as clip-on earrings, earring backs, and screw-backs.
- Choose the right findings: Ensure you select findings that are safe for your ears and match the colour of your earring design.
- Consider colour options: If you want your earrings to stand out, look for findings in unique colours that will enhance the design of the earrings.
When attaching your earrings, ensure all the pieces are secure and that your findings are of good quality.
Once your earrings are attached, you’ll have an eye-catching pair of Lippan Art Earrings to enjoy.
Paint Design
You can customize your Lippan Art Earrings by painting a unique design onto them, and you’ll need to choose the right colours to create the perfect look. Explore various painting techniques and colour combinations to create your desired look. Think outside the box for creative inspiration, and remember to consider texture exploration and design layering.
You should use thin brushstrokes to mix and match different shades depending on your chosen colours. Or, use a thicker paintbrush to layer colours and create a unique marbled effect. You can also experiment with adding glitter to the design for a sparkly look.
When it comes to colour combinations, the possibilities are endless! Try combining bright, bold colours for a fun and eye-catching design. Or, opt for a more subtle look using earth tones and pastels. You can even try a mix of the two for a unique style.
Adding texture to your design can also create a more interesting look. Try using a sponge and dabbing paint onto the earrings to create a textured effect. You can also use a variety of objects, like coins, stamps, or even leaves, to add a unique touch to the design.

Seal Earrings
Once you’ve created a unique design for your Lippan Art Earrings, you’ll want to seal them to ensure the design lasts. This can be done using a sealant spray or a clear acrylic sealer.
Painting techniques like shading and blending different colours can create a beautiful design, and you can also combine colour combinations for creative inspiration. To enhance the design, you can use sequins, beads, stones, glitter, and other materials. You can also use smaller items to create intricate patterns.
When designing your earrings, consider what design ideas and embellishment options you’d like to use. Once completed, use the sealant spray or acrylic sealer to protect your design.
Here are some tips to keep in mind when creating Lippan Art Earrings:
- Experiment with different painting techniques and colour combinations
- Brainstorm design ideas and embellishment options
- Use a sealant spray or clear acrylic sealer to protect your design
Conclusion
You’ve just made beautiful, unique lippan art earrings. Not only are they a great conversation starter, but they also show your creativity and style!
Plus, a recent survey shows handmade jewellery is the most popular fashion choice among women aged 18-35.
So, go ahead and show off your new earrings– you’re sure to make a statement!


